文章目录
  1. 1. 背景
  2. 2. 动态注册
    1. 2.1. 接口端
    2. 2.2. 服务端
  3. 3. 静态注册
  4. 4. 总结

背景

我们的平板增加了一个关机闹钟的功能。就是设备在关机的情况也能唤醒然后响闹钟。实现方法是:在 kernel 中增加一个 RTC 时钟(关机情况下,板载的 RTC 时钟还在运行的,所以你关机一段时间发现电池会变少),然后提前一段时间开机(我们设定的是1分钟,得给点时间给开机,我们的平板开机要40多秒咧),然后闹钟模块接收开机广播(ACTION_BOOT_COMPLETED),然后把 android 应用层的闹钟设置下去,然后就能实现关机闹钟功能了。

但是最近遇到一个问题:说关机闹钟,到了时间设备能唤醒,但是闹钟不响。于是分析一下 android 广播的处理流程(这里以开机广播为例)。然后顺带记录下分析过程,以后忘记看几眼能捡起来。

android 广播的注册方式分为2种:一种是动态注册,一种是静态注册。哦,对了,在说之前,照例把相关源码位置啰嗦一下(4.2.2):

1
2
3
4
5
6
7
8
9
10
11
12
13
14
15
16
17
18
19
20
21
# Content 广播相关的代码
frameworks/base/core/java/android/app/ContextImpl.java
frameworks/base/core/java/android/app/LoadedApk.java
frameworks/base/core/java/android/content/Intent.java
frameworks/base/core/java/android/content/IntentFilter.java
frameworks/base/core/java/android/content/BroadcastReceiver.java
frameworks/base/core/java/android/content/IIntentReceiver.aidl
# 广播解析相关代码
frameworks/base/services/java/com/android/server/IntentResolver.java
# AM 广播相关代码
frameworks/base/services/java/com/android/server/am/ActivityManagerService.java
frameworks/base/services/java/com/android/server/am/RecevierList.java
frameworks/base/services/java/com/android/server/am/BroadcastFilter.java
frameworks/base/services/java/com/android/server/am/BroadcastRecord.java
# PM 广播相关代码
frameworks/base/services/java/com/android/server/pm/PackageManagerService.java

动态注册

接口端

我们先来说说动态注册。动态注册是在程序当中调用 Context(ContextImpl)的接口来注册的:

1
2
public Intent registerReceiver(BroadcastReceiver receiver, IntentFilter filter)

其中一般自己要继承 BoradcastReceiver,然后实现里面的 onReceive 函数:

1
2
3
4
// Context 是运行该 receiver 所在在的 context
// Intent 是所接收到的广播发出的 intent
public abstract void onReceive(Context context, Intent intent);

然后那个 IntentFilter 里面可以设置要接收的广播,可以设置好多种类型,具体的自己去翻 api 文档。一般简单的可以直接设一个 ACTION。然后因为这个是需要在程序运行中拿 Context 去注册的,所以这种注册就有一个特点:接收广播的进程已经运行起来了

接下来我们就去看看这个注册过程是怎么样的。首先调用的是 Context(Activity、Service 里均可以调用)的 registerReceiver ,这个其实是挂 ContextImpl 里面的同名函数的马甲:

1
2
3
4
5
6
7
8
9
10
11
12
@Override
public Intent registerReceiver(BroadcastReceiver receiver, IntentFilter filter) {
return registerReceiver(receiver, filter, null, null);
}
@Override
public Intent registerReceiver(BroadcastReceiver receiver, IntentFilter filter,
String broadcastPermission, Handler scheduler) {
return registerReceiverInternal(receiver, getUserId(),
filter, broadcastPermission, scheduler, getOuterContext());
}

可以看出最后是调用 registerReceiverInternal 这个函数的。然后我们用的那个没指定权限(我们先不管啥权限之类的),还有 Handler。传过去的是 null:

1
2
3
4
5
6
7
8
9
10
11
12
13
14
15
16
17
18
19
20
21
22
23
24
25
26
27
28
29
30
31
32
33
private Intent registerReceiverInternal(BroadcastReceiver receiver, int userId,
IntentFilter filter, String broadcastPermission,
Handler scheduler, Context context) {
IIntentReceiver rd = null;
if (receiver != null) {
if (mPackageInfo != null && context != null) {
if (scheduler == null) {
// 默认使用的是当前注册进程的主线程来处理接收到的广播
scheduler = mMainThread.getHandler();
}
// 如果 mPackageInfo(LoadedApk) 不为空,去调用其中的方法取 IIntentReceiver
rd = mPackageInfo.getReceiverDispatcher(
receiver, context, scheduler,
mMainThread.getInstrumentation(), true);
} else {
if (scheduler == null) {
scheduler = mMainThread.getHandler();
}
// 否则直接 new 一个新的出来
rd = new LoadedApk.ReceiverDispatcher(
receiver, context, scheduler, null, true).getIIntentReceiver();
}
}
try {
// 最后还是要去 AM 里面去注册
return ActivityManagerNative.getDefault().registerReceiver(
mMainThread.getApplicationThread(), mBasePackageName,
rd, filter, broadcastPermission, userId);
} catch (RemoteException e) {
return null;
}
}

然后我们得先说 IIntentReceiver 这个东西。这个是保存广播最基本的数据了。这个是以 II 开头的,就知道这个实现了 Binder 接口支持 IPC 访问的。这个是用 aidl 写的,接口只有一个:

1
2
3
4
5
6
7
8
9
10
11
12
13
// 这个看注释就知道是接收到广播后触发处理的函数
/*
* System private API for dispatching intent broadcasts. This is given to the
* activity manager as part of registering for an intent broadcasts, and is
* called when it receives intents.
*
* {@hide}
*/
oneway interface IIntentReceiver {
void performReceive(in Intent intent, int resultCode, String data,
in Bundle extras, boolean ordered, boolean sticky, int sendingUser);
}

然后 LoadApk 中的一个内部类的内部类(LoadedApk.ReceiverDispatcher.InnerReceiver)实现了这个接口:

1
2
3
4
5
6
7
8
9
10
11
12
13
14
15
16
17
18
19
20
21
22
23
24
25
26
27
28
29
30
31
32
33
34
35
36
37
38
39
40
41
42
43
44
45
46
47
48
49
50
51
52
53
54
55
56
57
58
59
60
61
62
63
64
65
66
67
68
69
70
71
72
73
74
75
76
77
static final class ReceiverDispatcher {
// 这里是 Bn 端啦,注册的进程运行处理函数(Bp 端的实现 aidl 自动生成鸟)
final static class InnerReceiver extends IIntentReceiver.Stub {
final WeakReference<LoadedApk.ReceiverDispatcher> mDispatcher;
final LoadedApk.ReceiverDispatcher mStrongRef;
InnerReceiver(LoadedApk.ReceiverDispatcher rd, boolean strong) {
mDispatcher = new WeakReference<LoadedApk.ReceiverDispatcher>(rd);
mStrongRef = strong ? rd : null;
}
public void performReceive(Intent intent, int resultCode, String data,
Bundle extras, boolean ordered, boolean sticky, int sendingUser) {
// 这里我们先不分析处理过程,留到后面再说
... ...
}
}
... ...
final IIntentReceiver.Stub mIIntentReceiver;
final BroadcastReceiver mReceiver;
final Context mContext;
final Handler mActivityThread;
final Instrumentation mInstrumentation;
final boolean mRegistered;
final IntentReceiverLeaked mLocation;
RuntimeException mUnregisterLocation;
boolean mForgotten;
... ...
ReceiverDispatcher(BroadcastReceiver receiver, Context context,
Handler activityThread, Instrumentation instrumentation,
boolean registered) {
if (activityThread == null) {
throw new NullPointerException("Handler must not be null");
}
// new 这个 ReceiverDispatcher 的时候就会 new 一个 InnerReceiver
mIIntentReceiver = new InnerReceiver(this, !registered);
// 保存广播接收器对象
mReceiver = receiver;
mContext = context;
// 保存指定的处理广播的线程(Handler)
mActivityThread = activityThread;
mInstrumentation = instrumentation;
mRegistered = registered;
mLocation = new IntentReceiverLeaked(null);
mLocation.fillInStackTrace();
}
void validate(Context context, Handler activityThread) {
if (mContext != context) {
throw new IllegalStateException(
"Receiver " + mReceiver +
" registered with differing Context (was " +
mContext + " now " + context + ")");
}
if (mActivityThread != activityThread) {
throw new IllegalStateException(
"Receiver " + mReceiver +
" registered with differing handler (was " +
mActivityThread + " now " + activityThread + ")");
}
}
... ...
IIntentReceiver getIIntentReceiver() {
return mIIntentReceiver;
}
... ...
}

这个 LoadedApk 看名字,基本上就是和本应用程序包相关的东西(manifest 里面申明的那一堆东西基本上都在这里,当然扫描、解析是 PMS 干的)。然后它提供一个 IIntentReceiver 的 Bn 实现。它会保存调用者传递过来的 Handler,这个也就是说我们可以指定广播处理的线程(哪天有空把 Handler、Looper 也写下分析),如果我们没有指定的话,默认用注册进程的主线程(所以如果要在广播接收中做一些耗时的操作,请开一个后台线程作为接收的处理线程)。然后我们回到 ContextImpl 的注册函数那,有一个处理,如果 mPackageInfo 不为空,就去调用 LoadedApk 里的函数去取:

1
2
3
4
5
6
7
8
9
10
11
12
13
14
15
16
17
18
19
20
21
22
23
24
25
26
27
28
29
30
31
32
33
34
public IIntentReceiver getReceiverDispatcher(BroadcastReceiver r,
Context context, Handler handler,
Instrumentation instrumentation, boolean registered) {
synchronized (mReceivers) {
LoadedApk.ReceiverDispatcher rd = null;
HashMap<BroadcastReceiver, LoadedApk.ReceiverDispatcher> map = null;
// 动态注册传过来的是 true
if (registered) {
// 其实就是内部把之前注册过的保存了起来,如果后面重复注册一样的,可以不用重复处理
map = mReceivers.get(context);
if (map != null) {
rd = map.get(r);
}
}
if (rd == null) {
// 如果之前没有注册过的话,还是要创建一个新的
rd = new ReceiverDispatcher(r, context, handler,
instrumentation, registered);
if (registered) {
if (map == null) {
map = new HashMap<BroadcastReceiver, LoadedApk.ReceiverDispatcher>();
mReceivers.put(context, map);
}
map.put(r, rd);
}
} else {
// 这个验证代码去看前面,就是检测下是不是当前运行的环境和线程而已
rd.validate(context, handler);
}
rd.mForgotten = false;
return rd.getIIntentReceiver();
}
}

然后后面就去 AMS 里面去注册了。其实 AMS 可以说是广播的中转站,应用程序通过 AMS 发送广播,然后 AMS 找到对应的接收器进行广播分发(咋感觉和消息分发差不多)。

服务端

来看下 AMS 中 registerReceiver :

1
2
3
4
5
6
7
8
9
10
11
12
13
14
15
16
17
18
19
20
21
22
23
24
25
26
27
28
29
30
31
32
33
34
35
36
37
38
39
40
41
42
43
44
45
46
47
48
49
50
51
52
53
54
55
56
57
58
59
60
61
62
63
64
65
66
67
68
69
70
71
72
73
74
75
76
77
78
79
80
81
82
83
84
85
86
87
88
89
90
91
92
93
94
95
96
97
98
99
100
101
102
103
104
105
106
107
108
109
110
111
112
113
114
115
116
117
118
119
120
121
122
123
124
125
126
127
128
129
130
131
132
133
134
// caller: 客户端传过来标示客户进程的
// receiver: 客户端准备好的接收广播的对象,这里传过来已经是 Bp 端了
public Intent registerReceiver(IApplicationThread caller, String callerPackage,
IIntentReceiver receiver, IntentFilter filter, String permission, int userId) {
enforceNotIsolatedCaller("registerReceiver");
int callingUid;
int callingPid;
// IPC 服务端多线程,接口实现照例加锁
synchronized(this) {
// 这里是去取注册调用者的进程信息,pid、uid 之类的
ProcessRecord callerApp = null;
if (caller != null) {
callerApp = getRecordForAppLocked(caller);
if (callerApp == null) {
throw new SecurityException(
"Unable to find app for caller " + caller
+ " (pid=" + Binder.getCallingPid()
+ ") when registering receiver " + receiver);
}
if (callerApp.info.uid != Process.SYSTEM_UID &&
!callerApp.pkgList.contains(callerPackage)) {
throw new SecurityException("Given caller package " + callerPackage
+ " is not running in process " + callerApp);
}
callingUid = callerApp.info.uid;
callingPid = callerApp.pid;
} else {
callerPackage = null;
callingUid = Binder.getCallingUid();
callingPid = Binder.getCallingPid();
}
// 把用户 Id 也取到了,android 中多用户的广播是分开的,能够避免一些公共广播发出来,
// 把其他用户安装的应用也启动起来
userId = this.handleIncomingUser(callingPid, callingUid, userId,
true, true, "registerReceiver", callerPackage);
List allSticky = null;
// 这个和 sticky 功能相关我们不管先
// Look for any matching sticky broadcasts...
Iterator actions = filter.actionsIterator();
if (actions != null) {
while (actions.hasNext()) {
String action = (String)actions.next();
allSticky = getStickiesLocked(action, filter, allSticky,
UserHandle.USER_ALL);
allSticky = getStickiesLocked(action, filter, allSticky,
UserHandle.getUserId(callingUid));
}
} else {
allSticky = getStickiesLocked(null, filter, allSticky,
UserHandle.USER_ALL);
allSticky = getStickiesLocked(null, filter, allSticky,
UserHandle.getUserId(callingUid));
}
// The first sticky in the list is returned directly back to
// the client.
Intent sticky = allSticky != null ? (Intent)allSticky.get(0) : null;
if (DEBUG_BROADCAST) Slog.v(TAG, "Register receiver " + filter
+ ": " + sticky);
if (receiver == null) {
return sticky;
}
// 这个根据传过来的 IIntentReceiver(receiver) 构造一个 ReceiverList
// 这个其实一个数组,一个 receiver 可能可以对应多个 Intent(广播)
ReceiverList rl
= (ReceiverList)mRegisteredReceivers.get(receiver.asBinder());
if (rl == null) {
rl = new ReceiverList(this, callerApp, callingPid, callingUid,
userId, receiver);
if (rl.app != null) {
rl.app.receivers.add(rl);
} else {
try {
// 这里注册了这个 recevier 的死亡通知函数(后面会知道这个注册的用处的)
receiver.asBinder().linkToDeath(rl, 0);
} catch (RemoteException e) {
return sticky;
}
rl.linkedToDeath = true;
}
mRegisteredReceivers.put(receiver.asBinder(), rl);
} else if (rl.uid != callingUid) {
throw new IllegalArgumentException(
"Receiver requested to register for uid " + callingUid
+ " was previously registered for uid " + rl.uid);
} else if (rl.pid != callingPid) {
throw new IllegalArgumentException(
"Receiver requested to register for pid " + callingPid
+ " was previously registered for pid " + rl.pid);
} else if (rl.userId != userId) {
throw new IllegalArgumentException(
"Receiver requested to register for user " + userId
+ " was previously registered for user " + rl.userId);
}
// 然后再根据上面的 ReceiverList 构造出一个 BroadcastFilter
BroadcastFilter bf = new BroadcastFilter(filter, rl, callerPackage,
permission, callingUid, userId);
rl.add(bf);
if (!bf.debugCheck()) {
Slog.w(TAG, "==> For Dynamic broadast");
}
// 这里是关键步骤了,把上面那个 BroadcastFilter add 到 IntentResolver 这个对象中。
// 这个东西后面分发广播的时候会用到(其实分发的时候查询这个里面的数据)。
mReceiverResolver.addFilter(bf);
// sticky 相关的继续无视
// Enqueue broadcasts for all existing stickies that match
// this filter.
if (allSticky != null) {
ArrayList receivers = new ArrayList();
receivers.add(bf);
int N = allSticky.size();
for (int i=0; i<N; i++) {
Intent intent = (Intent)allSticky.get(i);
BroadcastQueue queue = broadcastQueueForIntent(intent);
BroadcastRecord r = new BroadcastRecord(queue, intent, null,
null, -1, -1, null, receivers, null, 0, null, null,
false, true, true, -1);
queue.enqueueParallelBroadcastLocked(r);
queue.scheduleBroadcastsLocked();
}
}
return sticky;
}
}

我们先说说参数,IIntentReceiver 是支持 Binder 的,传过来的是 Bp,IntentFilter 实现了 Parcelable 接口,也能 IPC 传过来。然后我们再开始说代码,一开始先获取注册调用者的进程记录(ProcessRecord,这个东西在 Binder 篇有说过,这里不多说)。然后广播有个 sticky 的功能,我们先不管这些花哨功能先。后面出现了一个 ReceiverList 的对象,我们来看看:

1
2
3
4
5
6
7
8
9
10
11
12
13
14
15
16
17
18
19
20
21
22
23
24
25
26
27
28
29
30
31
/*
* A receiver object that has registered for one or more broadcasts.
* The ArrayList holds BroadcastFilter objects.
*/
class ReceiverList extends ArrayList<BroadcastFilter>
implements IBinder.DeathRecipient {
final ActivityManagerService owner;
public final IIntentReceiver receiver;
public final ProcessRecord app;
public final int pid;
public final int uid;
public final int userId;
BroadcastRecord curBroadcast = null;
boolean linkedToDeath = false;
String stringName;
ReceiverList(ActivityManagerService _owner, ProcessRecord _app,
int _pid, int _uid, int _userId, IIntentReceiver _receiver) {
owner = _owner;
receiver = _receiver;
app = _app;
pid = _pid;
uid = _uid;
userId = _userId;
}
... ...
}

这个是自己改造的一个 ArrayList,里面存放的是 BroadcastFilter,然后注意它保存了 IIntentReceiver(从 AMS 注册接口调用者那里得到)。然后上面的代码后面马上就构造出了一个 BroadcastFilter,添加到这个 ReceiverList 中去了。这个 BroadcastFilter 我们也来稍微看下它的结构吧:

1
2
3
4
5
6
7
8
9
10
11
12
13
14
15
16
17
18
19
20
21
22
class BroadcastFilter extends IntentFilter {
// Back-pointer to the list this filter is in.
final ReceiverList receiverList;
final String packageName;
final String requiredPermission;
final int owningUid;
final int owningUserId;
BroadcastFilter(IntentFilter _filter, ReceiverList _receiverList,
String _packageName, String _requiredPermission, int _owningUid, int _userId) {
super(_filter);
receiverList = _receiverList;
packageName = _packageName;
requiredPermission = _requiredPermission;
owningUid = _owningUid;
owningUserId = _userId;
}
... ...
}

继续自 IntentFilter(这个我就不多说了,注册广播的应该对这个很熟悉了)。上面代码 AMS 中还保存了已经注册过的 RecieverList(mRegisteredReceivers),会先去以前的列表里面去找,看之前是不是注册过,这个可以防止多个重复的 broadcast recevier。然后到最后了, mReceiverResolver.addFilter(bf); 这里就很关键了。我们先来看看这个 mReceiverResolver 是什么东西:

1
2
3
4
5
6
7
8
9
10
11
12
13
14
15
16
17
18
19
20
21
22
23
24
25
26
27
28
29
30
31
32
33
34
35
36
37
38
39
40
41
42
43
44
45
46
47
48
49
50
51
52
53
54
55
56
57
58
59
60
61
62
63
64
65
66
67
68
69
70
71
72
//
// ================= ActivityManagerService.java ========================
/*
* Resolver for broadcast intents to registered receivers.
* Holds BroadcastFilter (subclass of IntentFilter).
*/
final IntentResolver<BroadcastFilter, BroadcastFilter> mReceiverResolver
= new IntentResolver<BroadcastFilter, BroadcastFilter>() {
... ...
};
// ================= IntentResolver.java ========================
/*
* {@hide}
*/
public abstract class IntentResolver<F extends IntentFilter, R extends Object> {
final private static String TAG = "IntentResolver";
final private static boolean DEBUG = false;
final private static boolean localLOGV = DEBUG || false;
final private static boolean VALIDATE = false;
... ...
// 存数据的都在这里,基本不是 HashMap 就是 HashSet
// 注释也写得很清楚是拿来存什么的
/*
* All filters that have been registered.
*/
private final HashSet<F> mFilters = new HashSet<F>();
/*
* All of the MIME types that have been registered, such as "image/jpeg",
* "image/*", or "{@literal *}/*".
*/
private final HashMap<String, F[]> mTypeToFilter = new HashMap<String, F[]>();
/*
* The base names of all of all fully qualified MIME types that have been
* registered, such as "image" or "*". Wild card MIME types such as
* "image/*" will not be here.
*/
private final HashMap<String, F[]> mBaseTypeToFilter = new HashMap<String, F[]>();
/*
* The base names of all of the MIME types with a sub-type wildcard that
* have been registered. For example, a filter with "image/*" will be
* included here as "image" but one with "image/jpeg" will not be
* included here. This also includes the "*" for the "{@literal *}/*"
* MIME type.
*/
private final HashMap<String, F[]> mWildTypeToFilter = new HashMap<String, F[]>();
/*
* All of the URI schemes (such as http) that have been registered.
*/
private final HashMap<String, F[]> mSchemeToFilter = new HashMap<String, F[]>();
/*
* All of the actions that have been registered, but only those that did
* not specify data.
*/
private final HashMap<String, F[]> mActionToFilter = new HashMap<String, F[]>();
/*
* All of the actions that have been registered and specified a MIME type.
*/
private final HashMap<String, F[]> mTypedActionToFilter = new HashMap<String, F[]>();
}

mReceiverResolver 继承自 IntentResolver 这个模板类。前面的 F 是传入类型,保存在列表(HashMap、HashSet)里面的,后面那个 R 是传出类型,后面 AMS 处理广播的时候要向 IntentResolver 查询的,那个时候返回的就是 R。然后2个模板都是 BroadcastFilter。我们先继续看它的 addFilter 里面是怎么处理的(在父类里面):

1
2
3
4
5
6
7
8
9
10
11
12
13
14
15
16
17
18
19
20
21
22
23
24
25
26
27
28
29
30
31
32
33
34
35
36
37
public abstract class IntentResolver<F extends IntentFilter, R extends Object> {
public void addFilter(F f) {
if (localLOGV) {
Slog.v(TAG, "Adding filter: " + f);
f.dump(new LogPrinter(Log.VERBOSE, TAG, Log.LOG_ID_SYSTEM), " ");
Slog.v(TAG, " Building Lookup Maps:");
}
// 先保存到 mFilters 里面,这个相当于是所有总类型的
mFilters.add(f);
// 然后下面的是保 Scheme 的,IntentFilter 不是可以设置 Scheme 么
int numS = register_intent_filter(f, f.schemesIterator(),
mSchemeToFilter, " Scheme: ");
// 保存 Mime type 类型的,IntentFilter 也可以设置 Mime type
int numT = register_mime_types(f, " Type: ");
if (numS == 0 && numT == 0) {
// 如果 IntentFiler 既没有设置 Scheme 也没有设置 Mime type 就保存 Action
// IntentFiler 感觉还是 Action 用得多吧
register_intent_filter(f, f.actionsIterator(),
mActionToFilter, " Action: ");
}
if (numT != 0) {
// 这个和上面的区别在于指定了 Action 的同时还指定了 Mime type
register_intent_filter(f, f.actionsIterator(),
mTypedActionToFilter, " TypedAction: ");
}
// 下面的不用管,是兼容以前版本的格式的,VAILIDATE 设置为 false 的
if (VALIDATE) {
mOldResolver.addFilter(f);
verifyDataStructures(f);
}
}
}

这个 addFilter 大意就是把传过来的 F(这里是 BroadcastFilter)保存到对应的列表里面。不过我们还是继续去看看 register_intent_filter 里面的处理:

1
2
3
4
5
6
7
8
9
10
11
12
13
14
15
16
17
18
19
20
21
22
23
24
25
26
27
28
29
30
31
32
33
34
35
36
37
38
39
40
41
42
private final int register_intent_filter(F filter, Iterator<String> i,
HashMap<String, F[]> dest, String prefix) {
if (i == null) {
return 0;
}
int num = 0;
// 我们这里以 Action 为例,循环取出看看注册的 IntentFiler 里面包含多少个 Action
while (i.hasNext()) {
String name = i.next();
num++;
if (localLOGV) Slog.v(TAG, prefix + name);
// 这个 addFilter 是私有的,并且参数个数和上面的不一样
addFilter(dest, name, filter);
}
return num;
}
private final void addFilter(HashMap<String, F[]> map, String name, F filter) {
// 这个函数比较简单,就是把上面取到的 Action 和 传入的 filter 存到上面给定的 HashMap(HashSet) 中
F[] array = map.get(name);
if (array == null) {
array = newArray(2);
map.put(name, array);
array[0] = filter;
} else {
final int N = array.length;
int i = N;
while (i > 0 && array[i-1] == null) {
i--;
}
if (i < N) {
array[i] = filter;
} else {
F[] newa = newArray((N*3)/2);
System.arraycopy(array, 0, newa, 0, N);
newa[N] = filter;
map.put(name, newa);
}
}
}

处理比较简单,就是存下数据,不过注意这里 new 数据的时候函数 newArray, AMS 中的 mReceiverResolver 实现了这个函数(其实还实现了好个,这里先看这个):

1
2
3
4
5
@Override
protected BroadcastFilter[] newArray(int size) {
return new BroadcastFilter[size];
}

也挺简单的,就是返回具体模板的对象的数组而已。到这里动态注册的服务端的流程就完了。简单来说就是把传过来的接收处理对象(IItnentRecevier)和要接收的广播(IntentFilter)保存到了 AMS 的一个叫 mReceiverResolver 里面去了。但是由于对象层层封装,容易一下子看多了忘记这个倒数是啥东西了。于是我整了一张,看一下应该就会好了:
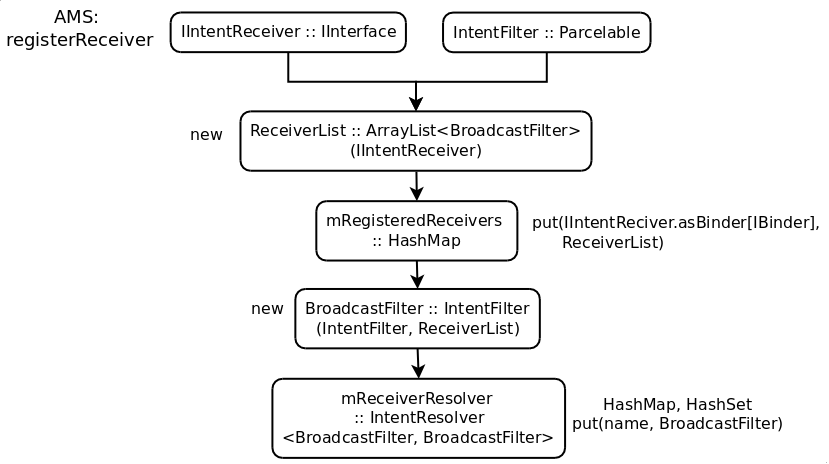
静态注册

上面说完了动态注册,我们来说下静态注册。和动态相对的,静态注册最大的特点就是: 进程不需要运行,并且 AMS 在处理广播的时候还会帮你把接收器所在的进程启动起来。静态注册在 AndroidMainfest.xml 中声明一个 recevier 就可以了,例如像下面这样:

1
2
3
4
5
6
7
8
9
<receiver android:name=".service.AlarmInitReceiver">
<intent-filter android:priority="90">
<action android:name="android.intent.action.BOOT_COMPLETED" />
<action android:name="android.intent.action.TIME_SET" />
<action android:name="android.intent.action.TIMEZONE_CHANGED" />
<action android:name="android.intent.action.LOCALE_CHANGED" />
</intent-filter>
</receiver>

那静态广播是怎么注册到系统里面的去咧。其实看到在 mainfest 声明就应该猜到是 PMS 扫描,然后将扫描结果存了起来。实际就是这样的,我们来看看具体流程。首先在 PMS 的构造函数有这么一个调用(PMS 会在 SystemService 初始化的时候启动起来,具体的去看 Binder 多线程篇):

1
2
3
4
5
6
7
8
9
10
11
12
13
14
15
16
17
18
19
20
21
22
23
24
25
26
27
28
29
30
31
32
33
34
35
36
37
38
39
40
41
42
43
44
45
46
47
48
49
50
51
52
53
54
55
56
57
58
59
60
61
62
63
64
65
66
67
68
69
70
71
72
73
74
75
76
77
78
79
80
81
82
83
84
85
86
87
88
89
90
public PackageManagerService(Context context, Installer installer,
boolean factoryTest, boolean onlyCore) {
... ...
// SS 业务函数多线程支持照例加锁(话说这里还加了2把)
synchronized (mInstallLock) {
// writer
synchronized (mPackages) {
mHandlerThread.start();
mHandler = new PackageHandler(mHandlerThread.getLooper());
// 设置一些路径
File dataDir = Environment.getDataDirectory();
mAppDataDir = new File(dataDir, "data");
mAppInstallDir = new File(dataDir, "app");
mAppLibInstallDir = new File(dataDir, "app-lib");
mAsecInternalPath = new File(dataDir, "app-asec").getPath();
mUserAppDataDir = new File(dataDir, "user");
mDrmAppPrivateInstallDir = new File(dataDir, "app-private");
... ...
// framework 的路径是 /system/framework
mFrameworkDir = new File(Environment.getRootDirectory(), "framework");
mDalvikCacheDir = new File(dataDir, "dalvik-cache");
... ...
// Find base frameworks (resource packages without code).
mFrameworkInstallObserver = new AppDirObserver(
mFrameworkDir.getPath(), OBSERVER_EVENTS, true);
mFrameworkInstallObserver.startWatching();
scanDirLI(mFrameworkDir, PackageParser.PARSE_IS_SYSTEM
| PackageParser.PARSE_IS_SYSTEM_DIR,
scanMode | SCAN_NO_DEX, 0);
// 系统应用的路径是 /system/app
// Collect all system packages.
mSystemAppDir = new File(Environment.getRootDirectory(), "app");
mSystemInstallObserver = new AppDirObserver(
mSystemAppDir.getPath(), OBSERVER_EVENTS, true);
mSystemInstallObserver.startWatching();
// 扫描系统应用
scanDirLI(mSystemAppDir, PackageParser.PARSE_IS_SYSTEM
| PackageParser.PARSE_IS_SYSTEM_DIR, scanMode, 0);
// /vendor/app 下面应该是留给 OEM 厂商定制的 app
// 不过一些 OEM 厂商不买 google 账,自己乱放(例如步步高)
// Collect all vendor packages.
mVendorAppDir = new File("/vendor/app");
mVendorInstallObserver = new AppDirObserver(
mVendorAppDir.getPath(), OBSERVER_EVENTS, true);
mVendorInstallObserver.startWatching();
// 扫描 OEM 定制应用
scanDirLI(mVendorAppDir, PackageParser.PARSE_IS_SYSTEM
| PackageParser.PARSE_IS_SYSTEM_DIR, scanMode, 0);
... ...
// 这个 onlyCore 是运行在加密的设备上("vold.decrypt" 被设置为 true)才是 true,
// 一般的是 false
if (!mOnlyCore) {
EventLog.writeEvent(EventLogTags.BOOT_PROGRESS_PMS_DATA_SCAN_START,
SystemClock.uptimeMillis());
mAppInstallObserver = new AppDirObserver(
mAppInstallDir.getPath(), OBSERVER_EVENTS, false);
mAppInstallObserver.startWatching();
// 这个路径前面设置过了是 /data/data,这里扫描普通应用
scanDirLI(mAppInstallDir, 0, scanMode, 0);
// 这里是扫描受 DRM 保护的应用
mDrmAppInstallObserver = new AppDirObserver(
mDrmAppPrivateInstallDir.getPath(), OBSERVER_EVENTS, false);
mDrmAppInstallObserver.startWatching();
scanDirLI(mDrmAppPrivateInstallDir, PackageParser.PARSE_FORWARD_LOCK,
scanMode, 0);
... ...
} else {
mAppInstallObserver = null;
mDrmAppInstallObserver = null;
}
... ...
} // synchronized (mPackages)
} // synchronized (mInstallLock)
}

SS(PMS) 是开机启动的,也就是说在开机的时候 PMS 会去扫描一系列目录下的应用去收集一些应用的信息(稍微扯远点,注意看上面有一些文件 Observer(这个是 android 自己弄了一个监视文件变动的 Observer)设置,会在监视相应目录下的文件变动,一有变动,PMS 会扫描变动,这也就是为什么调试的时候直接 push apk 到 /system/app 或者 /data/app 下面也是能够正常安装的原因)。扫描函数是 scanDirLI:

1
2
3
4
5
6
7
8
9
10
11
12
13
14
15
16
17
18
19
20
21
22
23
24
25
26
27
28
29
30
31
32
33
34
// 这个是扫描目录的
private void scanDirLI(File dir, int flags, int scanMode, long currentTime) {
String[] files = dir.list();
if (files == null) {
Log.d(TAG, "No files in app dir " + dir);
return;
}
if (DEBUG_PACKAGE_SCANNING) {
Log.d(TAG, "Scanning app dir " + dir);
}
// 这个写法,不支持递归目录咧(也不需要支持)
int i;
for (i=0; i<files.length; i++) {
File file = new File(dir, files[i]);
// 稍微判断下是不是 apk 文件(这里我们就不去看这个判断了)
if (!isPackageFilename(files[i])) {
// Ignore entries which are not apk's
continue;
}
// 罗列下指定目录下的 apk 文件,然后交给扫描文件的函数处理
PackageParser.Package pkg = scanPackageLI(file,
flags|PackageParser.PARSE_MUST_BE_APK, scanMode, currentTime, null);
// Don't mess around with apps in system partition.
if (pkg == null && (flags & PackageParser.PARSE_IS_SYSTEM) == 0 &&
mLastScanError == PackageManager.INSTALL_FAILED_INVALID_APK) {
// Delete the apk
Slog.w(TAG, "Cleaning up failed install of " + file);
file.delete();
}
}
}

这里把扫描单个 apk 文件的任务交给 scanPackageLI 这个函数了:

1
2
3
4
5
6
7
8
9
10
11
12
13
14
15
16
17
18
19
20
21
22
23
24
25
26
27
28
29
30
31
32
33
34
35
36
37
38
39
40
41
42
43
44
45
46
47
48
/*
* Scan a package and return the newly parsed package.
* Returns null in case of errors and the error code is stored in mLastScanError
*/
private PackageParser.Package scanPackageLI(File scanFile,
int parseFlags, int scanMode, long currentTime, UserHandle user) {
mLastScanError = PackageManager.INSTALL_SUCCEEDED;
String scanPath = scanFile.getPath();
parseFlags |= mDefParseFlags;
PackageParser pp = new PackageParser(scanPath);
pp.setSeparateProcesses(mSeparateProcesses);
pp.setOnlyCoreApps(mOnlyCore);
// PMS 中有一个专门解析 apk 文件的东西(PackageParser),里面包括了很多文件的解析
// 这里我们不去过多分析这个,以后有空再单独开一篇分析咯,这里就当它解析好了就行了
final PackageParser.Package pkg = pp.parsePackage(scanFile,
scanPath, mMetrics, parseFlags);
if (pkg == null) {
mLastScanError = pp.getParseError();
return null;
}
... ...
String codePath = null;
String resPath = null;
if ((parseFlags & PackageParser.PARSE_FORWARD_LOCK) != 0) {
if (ps != null && ps.resourcePathString != null) {
resPath = ps.resourcePathString;
} else {
// Should not happen at all. Just log an error.
Slog.e(TAG, "Resource path not set for pkg : " + pkg.packageName);
}
} else {
resPath = pkg.mScanPath;
}
codePath = pkg.mScanPath;
// Set application objects path explicitly.
setApplicationInfoPaths(pkg, codePath, resPath);
// 这里又调用另外一个同名不同参数的函数去处理了
// Note that we invoke the following method only if we are about to unpack an application
PackageParser.Package scannedPkg = scanPackageLI(pkg, parseFlags, scanMode
| SCAN_UPDATE_SIGNATURE, currentTime, user);
... ...
return scannedPkg;
}

又调用到同名,不同参数的函数中去了,而且这个函数巨长无比,有将近 1000 行,我们只看关键部分:

1
2
3
4
5
6
7
8
9
10
11
12
13
14
15
16
17
18
19
20
21
22
23
24
25
26
27
28
29
30
31
32
33
34
35
36
37
38
39
40
41
42
43
44
45
46
47
48
49
50
51
52
private PackageParser.Package scanPackageLI(PackageParser.Package pkg,
int parseFlags, int scanMode, long currentTime, UserHandle user) {
File scanFile = new File(pkg.mScanPath);
if (scanFile == null || pkg.applicationInfo.sourceDir == null ||
pkg.applicationInfo.publicSourceDir == null) {
// Bail out. The resource and code paths haven't been set.
Slog.w(TAG, " Code and resource paths haven't been set correctly");
mLastScanError = PackageManager.INSTALL_FAILED_INVALID_APK;
return null;
}
mScanningPath = scanFile;
... ...
// writer
synchronized (mPackages) {
// We don't expect installation to fail beyond this point,
if ((scanMode&SCAN_MONITOR) != 0) {
mAppDirs.put(pkg.mPath, pkg);
}
... ...
// 取 PackageParser 解析 manifest 中有声明了的 receiver
N = pkg.receivers.size();
r = null;
for (i=0; i<N; i++) {
PackageParser.Activity a = pkg.receivers.get(i);
a.info.processName = fixProcessName(pkg.applicationInfo.processName,
a.info.processName, pkg.applicationInfo.uid);
// 这个 addActivity 是关键步骤了
mReceivers.addActivity(a, "receiver");
if ((parseFlags&PackageParser.PARSE_CHATTY) != 0) {
if (r == null) {
r = new StringBuilder(256);
} else {
r.append(' ');
}
r.append(a.info.name);
}
}
if (r != null) {
if (DEBUG_PACKAGE_SCANNING) Log.d(TAG, " Receivers: " + r);
}
... ...
}
return pkg;
}

我们先来看这个 mReceivers 是什么:

1
2
3
4
5
6
7
8
9
10
11
// All available receivers, for your resolving pleasure.
final ActivityIntentResolver mReceivers =
new ActivityIntentResolver();
... ...
private final class ActivityIntentResolver
extends IntentResolver<PackageParser.ActivityIntentInfo, ResolveInfo> {
... ...
}

经过前面动态注册的分析,对于个 IntentResolver 模板类应该不陌生了吧。PMS 中也有一个,用来来保存静态的注册信息的(AMS 那个是保存动态的)。PMS 里面的 F 是 PackageParser.ActivityIntentInfo, R 是 ResolverInfo。我们来看下这个 F 的定义:

1
2
3
4
5
6
7
8
9
10
11
12
13
14
15
16
17
18
19
20
21
22
public static class IntentInfo extends IntentFilter {
public boolean hasDefault;
public int labelRes;
public CharSequence nonLocalizedLabel;
public int icon;
public int logo;
}
public final static class ActivityIntentInfo extends IntentInfo {
public final Activity activity;
public ActivityIntentInfo(Activity _activity) {
activity = _activity;
}
public String toString() {
return "ActivityIntentInfo{"
+ Integer.toHexString(System.identityHashCode(this))
+ " " + activity.info.name + "}";
}
}

还是得继承自 IntentFilter,只不过又多了一层,然后多了几个变量而已。然后 scanPackageLI 这个函数是传入 PackageParser.Activity 这个对象过去的,我们看看这个东西:

1
2
3
4
5
6
7
8
9
10
11
12
13
14
15
16
17
18
19
20
21
22
23
24
25
26
27
28
29
30
31
32
33
34
35
public static class Component<II extends IntentInfo> {
public final Package owner;
public final ArrayList<II> intents;
public final String className;
public Bundle metaData;
ComponentName componentName;
String componentShortName;
... ...
}
... ...
public final static class Activity extends Component<ActivityIntentInfo> {
public final ActivityInfo info;
public Activity(final ParseComponentArgs args, final ActivityInfo _info) {
super(args, _info);
info = _info;
info.applicationInfo = args.owner.applicationInfo;
}
public void setPackageName(String packageName) {
super.setPackageName(packageName);
info.packageName = packageName;
}
public String toString() {
return "Activity{"
+ Integer.toHexString(System.identityHashCode(this))
+ " " + getComponentShortName() + "}";
}
}

绕了几下,反正是 ActivityIntentInfo 的子类。至于 ActivityIntentInfo 怎么从 PackageParser 解析出来的,前面说了我们这里不做分析。然后我们直接去看 ActivityIntentResolver 的 addActivity:

1
2
3
4
5
6
7
8
9
10
11
12
13
14
15
16
17
18
19
20
21
22
23
24
25
26
27
28
29
30
31
32
33
34
35
// type 前面传入的是 "receiver"
public final void addActivity(PackageParser.Activity a, String type) {
final boolean systemApp = isSystemApp(a.info.applicationInfo);
mActivities.put(a.getComponentName(), a);
if (DEBUG_SHOW_INFO)
Log.v(
TAG, " " + type + " " +
(a.info.nonLocalizedLabel != null ? a.info.nonLocalizedLabel : a.info.name) + ":");
if (DEBUG_SHOW_INFO)
Log.v(TAG, " Class=" + a.info.name);
// 前面 Activity 的父类的父类 Component 中有一个 ArrayList 保存了系列 ActivityIntentInfo
// 然后就是 mainfest 里面声明了多少个 <intent-filer> 的标签,这里就有几个 ActivityIntentInfo
final int NI = a.intents.size();
for (int j=0; j<NI; j++) {
PackageParser.ActivityIntentInfo intent = a.intents.get(j);
// 这里有个优先级权限判断,如果不是系统应用,或者 type 类型是 activity(这里是 recevier)
// 优先级设置大于 0 的话,强制变成0
// 换句话说,只有系统应用能把 receiver 的优先级设置成大于 0
if (!systemApp && intent.getPriority() > 0 && "activity".equals(type)) {
intent.setPriority(0);
Log.w(TAG, "Package " + a.info.applicationInfo.packageName + " has activity "
+ a.className + " with priority > 0, forcing to 0");
}
if (DEBUG_SHOW_INFO) {
Log.v(TAG, " IntentFilter:");
intent.dump(new LogPrinter(Log.VERBOSE, TAG), " ");
}
if (!intent.debugCheck()) {
Log.w(TAG, "==> For Activity " + a.info.name);
}
// 调用父类 IntentResolver 的 addFilter 添加 IntentFilter
addFilter(intent);
}
}

这里有个解决前面背景中关机闹钟不响问题的关键——广播 receiver 接收优先级的设置。在 mainfest 的 intent-filter 标签中可以声明一个优先级(看我前面的那个例子),这个是一个 int 类型,一般默认是 0。数值越大,优先级越高,这个优先级在哪里会用到,到后面一篇,广播处理那里就能看到了。这个数值是由 PackageParser 解析 mainfest 中的声明得到的,从这里的判断可以看出,普通应用的广播 receiver 无法声明高于 0。但是这点好像只对静态注册的广播有限制,动态的可以使用 IntentFilter.setPriority 设置,虽然 API 文档里告诉你不要让这个值高于 SYSTEM_HIGH_PRIORITY(1000) ,但是 AMS 里面没有任何限制判断,所以你要耍下流氓可以把这个值设得很高。不过动态注册的 recevier 在并行广播处理(后面那篇处理的会解释什么叫并行广播、什么叫串行广播)中和静态的 receiver 的优先级有本质的区别(后面能知道本质区别在哪),所以动态的流氓点好像关系也不大。

扯了下优先级的问题。最后还是调用父类 IntentResolver 的 addFilter 保存到列表中,然后 PMS 的 ActivityIntentResolver 的 newArray 是这样的:

1
2
3
4
5
@Override
protected ActivityIntentInfo[] newArray(int size) {
return new ActivityIntentInfo[size];
}

这个 addFilter 就不重复说一遍了。

总结

通过上面的分析,可以看到,虽然广播接收器注册分动态和静态。但是最后的流程都是一样的,只不过一个接收器的数据保存在 AMS 中(动态的)一个接收器的数据保存在 PMS 中(静态的)。所以后面处理广播的时候查询动态的接收器直接用 AMS 自己的数据查,而查询静态的需要调用 PMS 的接口去查(不过它们2个都在一个进程里面,也算一家人啦)。

文章目录
  1. 1. 背景
  2. 2. 动态注册
    1. 2.1. 接口端
    2. 2.2. 服务端
  3. 3. 静态注册
  4. 4. 总结